

99% of the time you are gaming you are looking at your monitor. But sometimes you don’t feel comfortable looking at it, something is off while gaming, or your eyes hurt after a couple of matches. If this is the case, your monitor is not configured properly. Setting up your monitor properly is just as important as configuring whole system’s hardware and software for achieving the best experience possible you can get. Here are some tips and recommendation to get the best out of your monitor.
1. Connect you monitor into your graphics card’s video output
One of the common mistakes especially by beginners, is connecting their monitor to the motherboard’s video outputs. You can do this if your system doesn’t have a graphics card and your processor have integrated graphics. But if your system has already a graphics card, you should connect your monitor to the graphics card video outputs, ideally via HDMI or DisplayPort.

HDMI vs DisplayPort
For gaming, it is preferable that you connect your monitor via DisplayPort as it can provide higher refresh rate compared to its HDMI counterpart.

At 1080p, DisplayPort 1.2 can output 240 Hz while HDMI 1.4 can only output 165 Hz. Though HDMI 1.4 can output 165 Hz, more and more 1080p monitors are being released with 240 Hz refresh rate. To take full advantage of that you need to use DisplayPort, or check which version of HDMI you monitor AND graphics card support. And lastly, use appropriate version of cable, be it an HDMI or a DisplayPort cable for full compatibility.
2. Setting the correct resolution
Oftentimes the monitor will set to its native resolution the first time you plug it in, but not always. You will notice that images are stretched and out of shape, or blurry when the monitor is not set to its native resolution. To set the resolution, right-click on the desktop and click Display settings. Look for the Display Resolution setting, click on the drop-down menu and select the resolution that matches in your monitor’s specifications. It is also recommended that you install your latest graphics card driver before changing the resolution.

3. Refresh Rate
Just like the resolution, refresh rate sometimes will set to its maximum value, sometimes not in the first time you plug your monitor. Higher refresh rate (in Hz) will result smoother motion in your screen. To set the refresh rate, right-click on the desktop and click Display settings then go to Advanced display settings. Look for the Refresh rate option then select the maximum refresh rate available.


If you can’t see the refresh rate that matches your monitor’s refresh rate, it could be one of the following:
- Incorrect version of cable, be it an HDMI or DisplayPort cable. Check your monitor’s manual or specifications to check which versions of cables are compatible.
- Graphics driver is not installed.
- If the graphics card driver is already installed, open your graphics card software and look for the refresh rate setting.

4. Adaptive Sync
Before Adaptive Sync there is Vertical Sync (V-Sync). It matches the system’s FPS to the monitor’s refresh rate. If the monitor’s refresh rate is 60 Hz, the FPS will be limited to 60 even if can go higher. The benefit is it eliminated screen tearing. The problem is when the system’s FPS go lower than the monitor’s refresh rate, stuttering starts to exhibit during gameplay. This is where Adaptive Sync comes in. Adaptive Sync will match the monitor’s refresh rate to the system’s FPS, even if the FPS go lower than the refresh rate and don’t get any screen tearing and stuttering.

AMD FreeSync and Nvidia G-Sync are the brand names for this technology. Before, FreeSync monitors will only work with AMD graphics card and G-Sync monitors will only work with GeForce graphics card. But today that’s no longer the case. You can now use GeForce graphics card (at least GTX 10 series) to enable FreeSync and AMD graphics card for G-Sync compatible monitors released by the end of 2019.
To use Adaptive Sync, turn it on first in your monitor’s setting, then in your graphics card driver software.

For GeForce Graphics card, open the Nvidia Control Panel, go to set up G-Sync tab and click the Enable G-Sync, G-Sync compatible option. We recommend choosing the Enabled for windowed and full screen mode option, so you can still feel the smoothness even when not gaming.

For AMD, open the Radeon Software, go to settings (gear icon), then go to Display tab, and finally enable the Adaptive Sync setting.

When not to enable Adaptive Sync?
Adaptive Sync introduced input lag as a result of its extra processing to synchronize the system’s FPS and the monitor’s refresh rate. It also limits your FPS based on the highest refresh rate of your monitor. For fast-paced gaming like shooters, action, and racing, you want the highest fps available and minimum input lag to stay competitive. Turning off Adaptive Sync will give you this competitive edge. Adaptive Sync is best used with games that doesn’t need super high fps and fluidity of animations are priority. This includes RPG, RTS, and turn-based games.
5. High-dynamic Range (HDR)
Darker image will have more details on the bright lights of the image while brighter image will have more details on shadows. Blending it will produce an image that has the details of both dark and bright versions of the original image. That’s what HDR basically do, plus it also enhances the color saturation. It sounds fantastic, but in gaming this is still a hit or miss. Sometimes the scene is too bright or washed out, sometimes it completely changes the color tone of the scene.
To enable HDR, open your monitor’s setting and turn on HDR. Keep in mind that when HDR is enabled, some settings like brightness, contrast, gamma, and other settings that boosts color will be disabled, depending on the monitor’s model.
To enable HDR in Windows 11, right-click on the desktop and click Display settings then turn on the Use HDR setting (Windows HD color settings in Windows 10). To quickly toggle HDR on or off, press the Window key, ALT, and B simultaneously (Win key + ALT + B). This is great to immediately see the difference when it is enabled or not.

To enable HDR in games, go to the in-game settings, usually in video, display, or graphics settings, then look for HDR. If you don’t see an HDR option, maybe it doesn’t support HDR or it is permanently enabled. Also, some games don’t need Windows HDR to be enabled, and some will override the Windows HDR settings.

If you can’t enable HDR in Windows or in-game, maybe your graphics card is not HDR capable. For GeForce graphics card, the minimum is GTX 950, Radeon R9 380 for AMD, and Intel Arc and UHD Graphics 600 for Intel. An HDMI 2.0a or DisplayPort 1.4 cable is also required.
When not to use HDR?
HDR mode is specifically designed and developed for HDR content. Windows desktop is not an HDR content so it is better to turn HDR off. For movies, streaming, and in gaming, as we said earlier, HDR is still a hit or miss so we recommend turning off HDR, or you can use the shortcut key for enabling HDR (Win key + Alt + B) to see if the game or movie looks better or worst with HDR.
HDR quality also depends on the monitor you have. Not all HDR capable monitors are created equal and will not produce the same quality. There are different levels of HDR certifications and each tier produces different quality than the other. The Video Electronics Standards Association (VESA) is the one responsible certifying the monitors. For more details about HDR, you can visit https://displayhdr.org

6. Color Gamut
A color gamut is the range of colors a screen can produce and display (and record for cameras). These range of colors are based on the primary color red, green and blue with their saturation and brightness.

When you look at your monitor’s spec sheet you will see something like 100% sRGB, 77% DCI-P3, 78% Adobe RGB. This means that the monitor can produce 100% of the colors from sRGB but can only produce 78% of the colors from Adobe RGB. Setting your monitor in Adobe RGB mode might result in misrepresentation of colors – the image will look dull, washed out, or over saturated. For gaming, sRGB is the best because games are mainly developed in sRGB. For HDR games and content, look for monitors with 85% to 100% DCI-P3 color gamut.
You can get more details about Color Gamut here.
7. Brightness, Contrast, and Gamma
Brightness, contrast, and gamma are probably the easiest to set. You can use the Display Color Calibration tool of Windows to correctly set these. Take note to make adjustments from your monitor, not in Windows. For Gamma settings, the standard setting is 2.2. If you can’t find this setting or value, usually it is the default gamma and the middle or medium gamma.
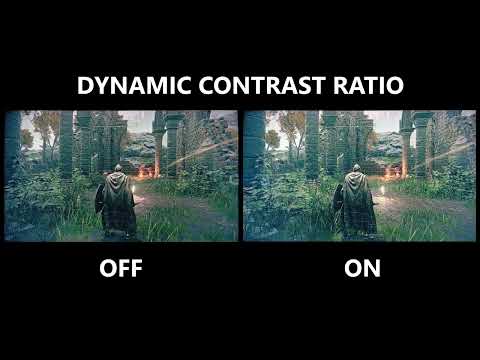
8. Dynamic Contrast Ratio (DCR)
Dynamic Contrast Ratio is a feature that adjusts the contrast of your monitor in real-time, based on the content being displayed. This means that bright and dark parts of the scene or game will automatically adjust. This automatic change in contrast from scene to scene might get you distracted, so we recommend turning DCR off to have consistent contrast levels.
9. Color Temperature
Color temperature in monitors change the hue of white light that the screen emits. A color temperature of 7300K is the Normal or Neutral color. Lower Kelvin (K) values will make the white looks yellowish to reddish – these are the Warm colors (6500K), while higher values will make the white looks bluish and these are the Cool colors (9300K). Color temperature options varies in different monitor manufacturers and models. Options could be in Kelvin (K) or by description such as Warm, Normal or Neutral, and Cool.
Manufacturers also provide a Custom or User option to let the user customize the color temperature through RGB sliders or values. If the RGB values starts at 50, don’t set the values over 50 as it will put more stress in your monitor. If you want your monitor to look bluish or cool, reduce the red and green instead. If you want warm colors, reduce the green and blue.

10. Shadow Control or Shadow Boost
This setting brightens the dark areas of the scene without overexposing the already bright areas. Turning this on makes enemies or objects in dark areas easier to spot.
Different manufacturers have different names for this setting. Here are the other names for Shadow control in different manufacturers
AOC – Shadow Control
ViewSonic – Black Stabilization
MSI – Night Vision
BenQ – Black eQualizer
ASUS – Shadow Boost
DELL – Dark Stabilizer
LG – Black Stabilizer
Acer – Dark Boost
11. Dynamic Color Boost / Balance
Dynamic Color Boost ( or Balance, DCB ) enhances and adjusts the color levels and saturation to achieve vibrant looking scene. This setting has presets to enhance specific color and tone of the scene. In AOC monitors, for example, DCB can be set to Nature Skin, Green Field, Sky-blue, Full Enhance and Auto.
Be careful to set this properly according to what type of game or movie you are watching as it changes the tone and saturation of some colors. We recommend turning this off when you are doing color sensitive work such as photo and video editing.
12. Response Time Overdrive
Response Time or Pixel Overdrive adjusts the pixel transition in order to reduce ghosting especially in with fast moving objects. This is good for fast paced games like Counter-Strike, Valorant, and racing games.
You can adjust response time usually under these names, depending on the monitor’s manufacturer
-
- Overdrive
- OD Mode
- TraceFree
- Response Time
- AMA – Advanced Motion Accelerator
- Aim Stabilizer
Be careful not to set too much overdrive as it can create coronas or inverse ghosting. Read this for more information about response time overdrive.
13. Gaming Mode or Presets
Most gaming monitors now have gaming presets built-in. Usually they have presets for FPS, RPG, Racing, and Movie or Cinema. These presets adjust necessary settings to match the visuals and feel for different types content or games. This means that settings like Response Time, Color Boost, and other color settings will be locked. FPS preset automatically adjusts the contrast or the black equalization setting while the RPG preset enhances the color saturation for vivid visuals.
Most monitors will let you customize and save each preference for easier transition between presets.
14. Low Blue Light Mode
Low Blue Light mode or Blue Light Filter, decreases the amount of harmful blue light emitted by the display. Long exposure to blue light from displays can cause eye fatigue and headache and can damage eye lenses and/or retina.

Some monitors have different Low Blue Light presets which adjusts the amount of blue light reduction according to the content you are viewing. These presets are usually for multimedia, web browsing, and for reading. We recommend turning this setting off when doing color sensitive task like photo editing as it changes the tone of the image displayed caused by reduced blue light.
15. DDC/CI and Software Control
Display Data Channel / Command Interface (DDC/CI) is a communication protocol that allows you to control monitor settings through the video cable. This means you can control the monitor settings through the software provided by the manufacturer which is more convenient than using the physical buttons of the monitor.
Not all monitors have this feature, but most gaming monitor have this. Check the monitor’s spec sheet or manual to confirm if the monitor has this feature.
Summary
From CRT to OLED monitors, from 60Hz, simple brightness and contrast adjustments, to a ton of settings and features, monitors have come a long way to deliver life-like visuals and experience.
It is true that customizing monitors nowadays is complicated and troublesome, but that complexity speaks for their flexibility to be customized and achieved the perfect visuals for every content we are consuming, whether it is for gaming, watching movies, or just for browsing the internet.
We hope that this guide brings clarity and understanding to easily set the right settings and enjoy the best experience out of your monitor.
For settings that we didn’t include, check your monitor manual for the description of each setting and feel free to ask us in the comments section.


